Serial UART console
Most simple and common way to connect almost any embedded device is serial UART port. You can find one inside any Smart TV or Media Center, WiFi Router and almost any kind of complex electronic device provides this port. The reason to expose this port may be different, but usually is used for maintenance, debug and diagnostics. Be careful with [un] authorized accesses to any device: please check device documentation and contact support first.
For everything you would like to know about serial communication please refer to this article: https://www.freebsd.org/doc/en_US.ISO8859-1/articles/serial-uart/index.html
Original specification for DB9 and DB25 connectors defines a lot of control and synchronization signals like DTR – “Data Terminal Ready”, DSR – “Data Set Ready” or RI – “Ring Indicator”. Signals used especially for synchronization with ancient and slow terminals with small buffers. Currently many devices successfully use only TX and RX pins for serial communication and all other pins are simply useless.
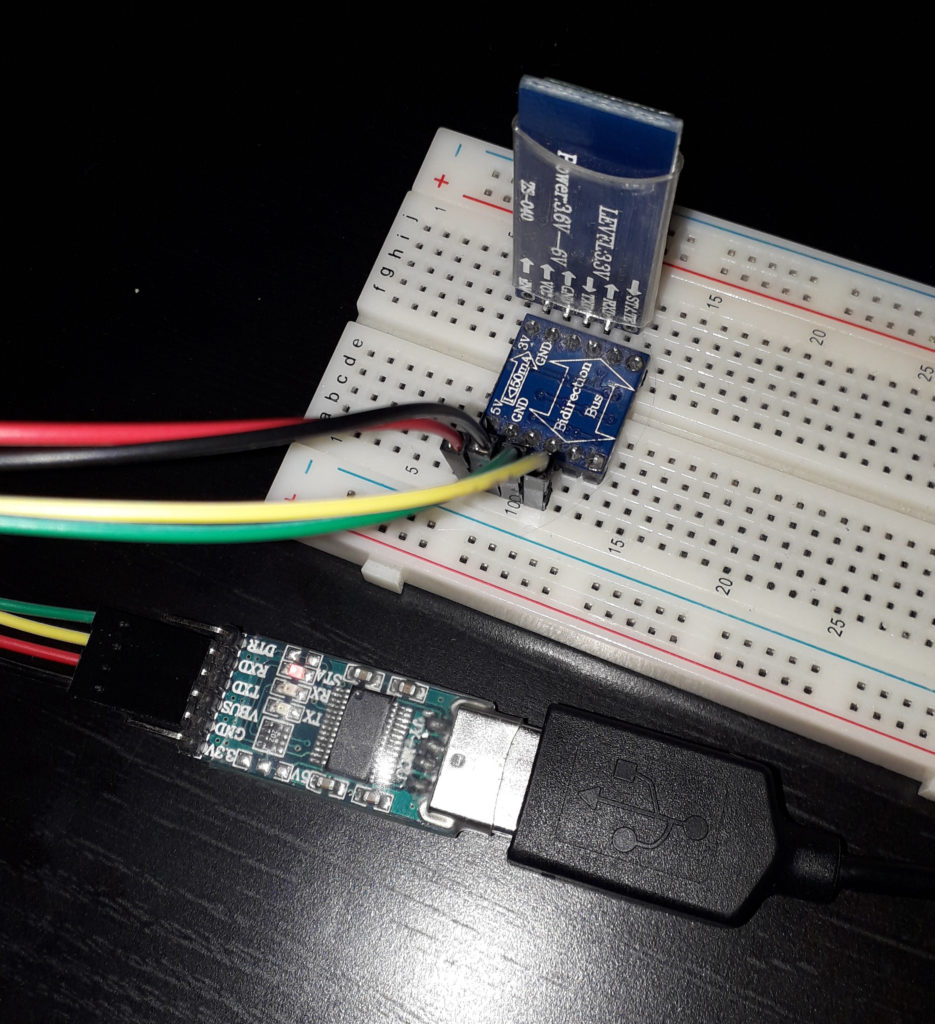
Actually there are many ways to connect to the serial port, for example you can use “USB to Serial” converter or “Serial Bluetooth” module; almost any embedded development kit should support UART / USART connection. Before selecting your converter, check signal levels, is common to find 5v and 3.3v devices. Do not mix unless your 3.3Volt device is specifically tolerant to 5volt signals, otherwise signal level converter is required. Some old devices or also special purpose serial devices may use +/-12 volt signal.
This kind of serial connection is not intended for high bandwidth or long range communications. Rather that it’s simple and robust enough to fulfill most of the basic but essential communication tasks.
Common baud-rates and maximum theoretical data throughput:
| 7bit data No parity | 8bit data No parity | 8bit data 1bit parity | |
| Baud-rate | CPS | CPS | CPS |
| 300 | 33 | 30 | 27 |
| 600 | 67 | 60 | 55 |
| 1200 | 133 | 120 | 109 |
| 1800 | 200 | 180 | 164 |
| 2400 | 267 | 240 | 218 |
| 4800 | 533 | 480 | 436 |
| 7200 | 800 | 720 | 655 |
| 9600 | 1067 | 960 | 873 |
| 14400 | 1600 | 1440 | 1309 |
| 19200 | 2133 | 1920 | 1745 |
| 38400 | 4267 | 3840 | 3491 |
| 57600 | 6400 | 5760 | 5236 |
| 115200 | 12800 | 11520 | 10473 |
| 128000 | 14222 | 12800 | 11636 |
| 153600 | 17067 | 15360 | 13964 |
| 230400 | 25600 | 23040 | 20945 |
| 256000 | 28444 | 25600 | 23273 |
| 460800 | 51200 | 46080 | 41891 |
| 921600 | 102400 | 92160 | 83782 |
| 1382400 | 153600 | 138240 | 125673 |
Although simple serial console I/O is powerful enough for many tasks where the error is negligible, big data transfer requires error handling and synchronization, like XON / XOFF or parity bit. Is also a good practice to add CRC to the transmitted data block, over then simple parity check. Because this type of communication may suffer of erasures and multi bit errors.
A lot of software and protocols was developed to support serial communication remote console and file transfer, like “[X|Y|Z]MODEM” or “Kermit”, “minicom” and “Putty” and many others more or less famous.
A simple and elegant way to connect router’s serial console is through HC-06 Slave bluetooth module.
This module exposes the SPP (Serial Port Profile) protocol for remote devices. Then, any Bluetooth Master near the router can connect it, obviously knowing the correct pin.
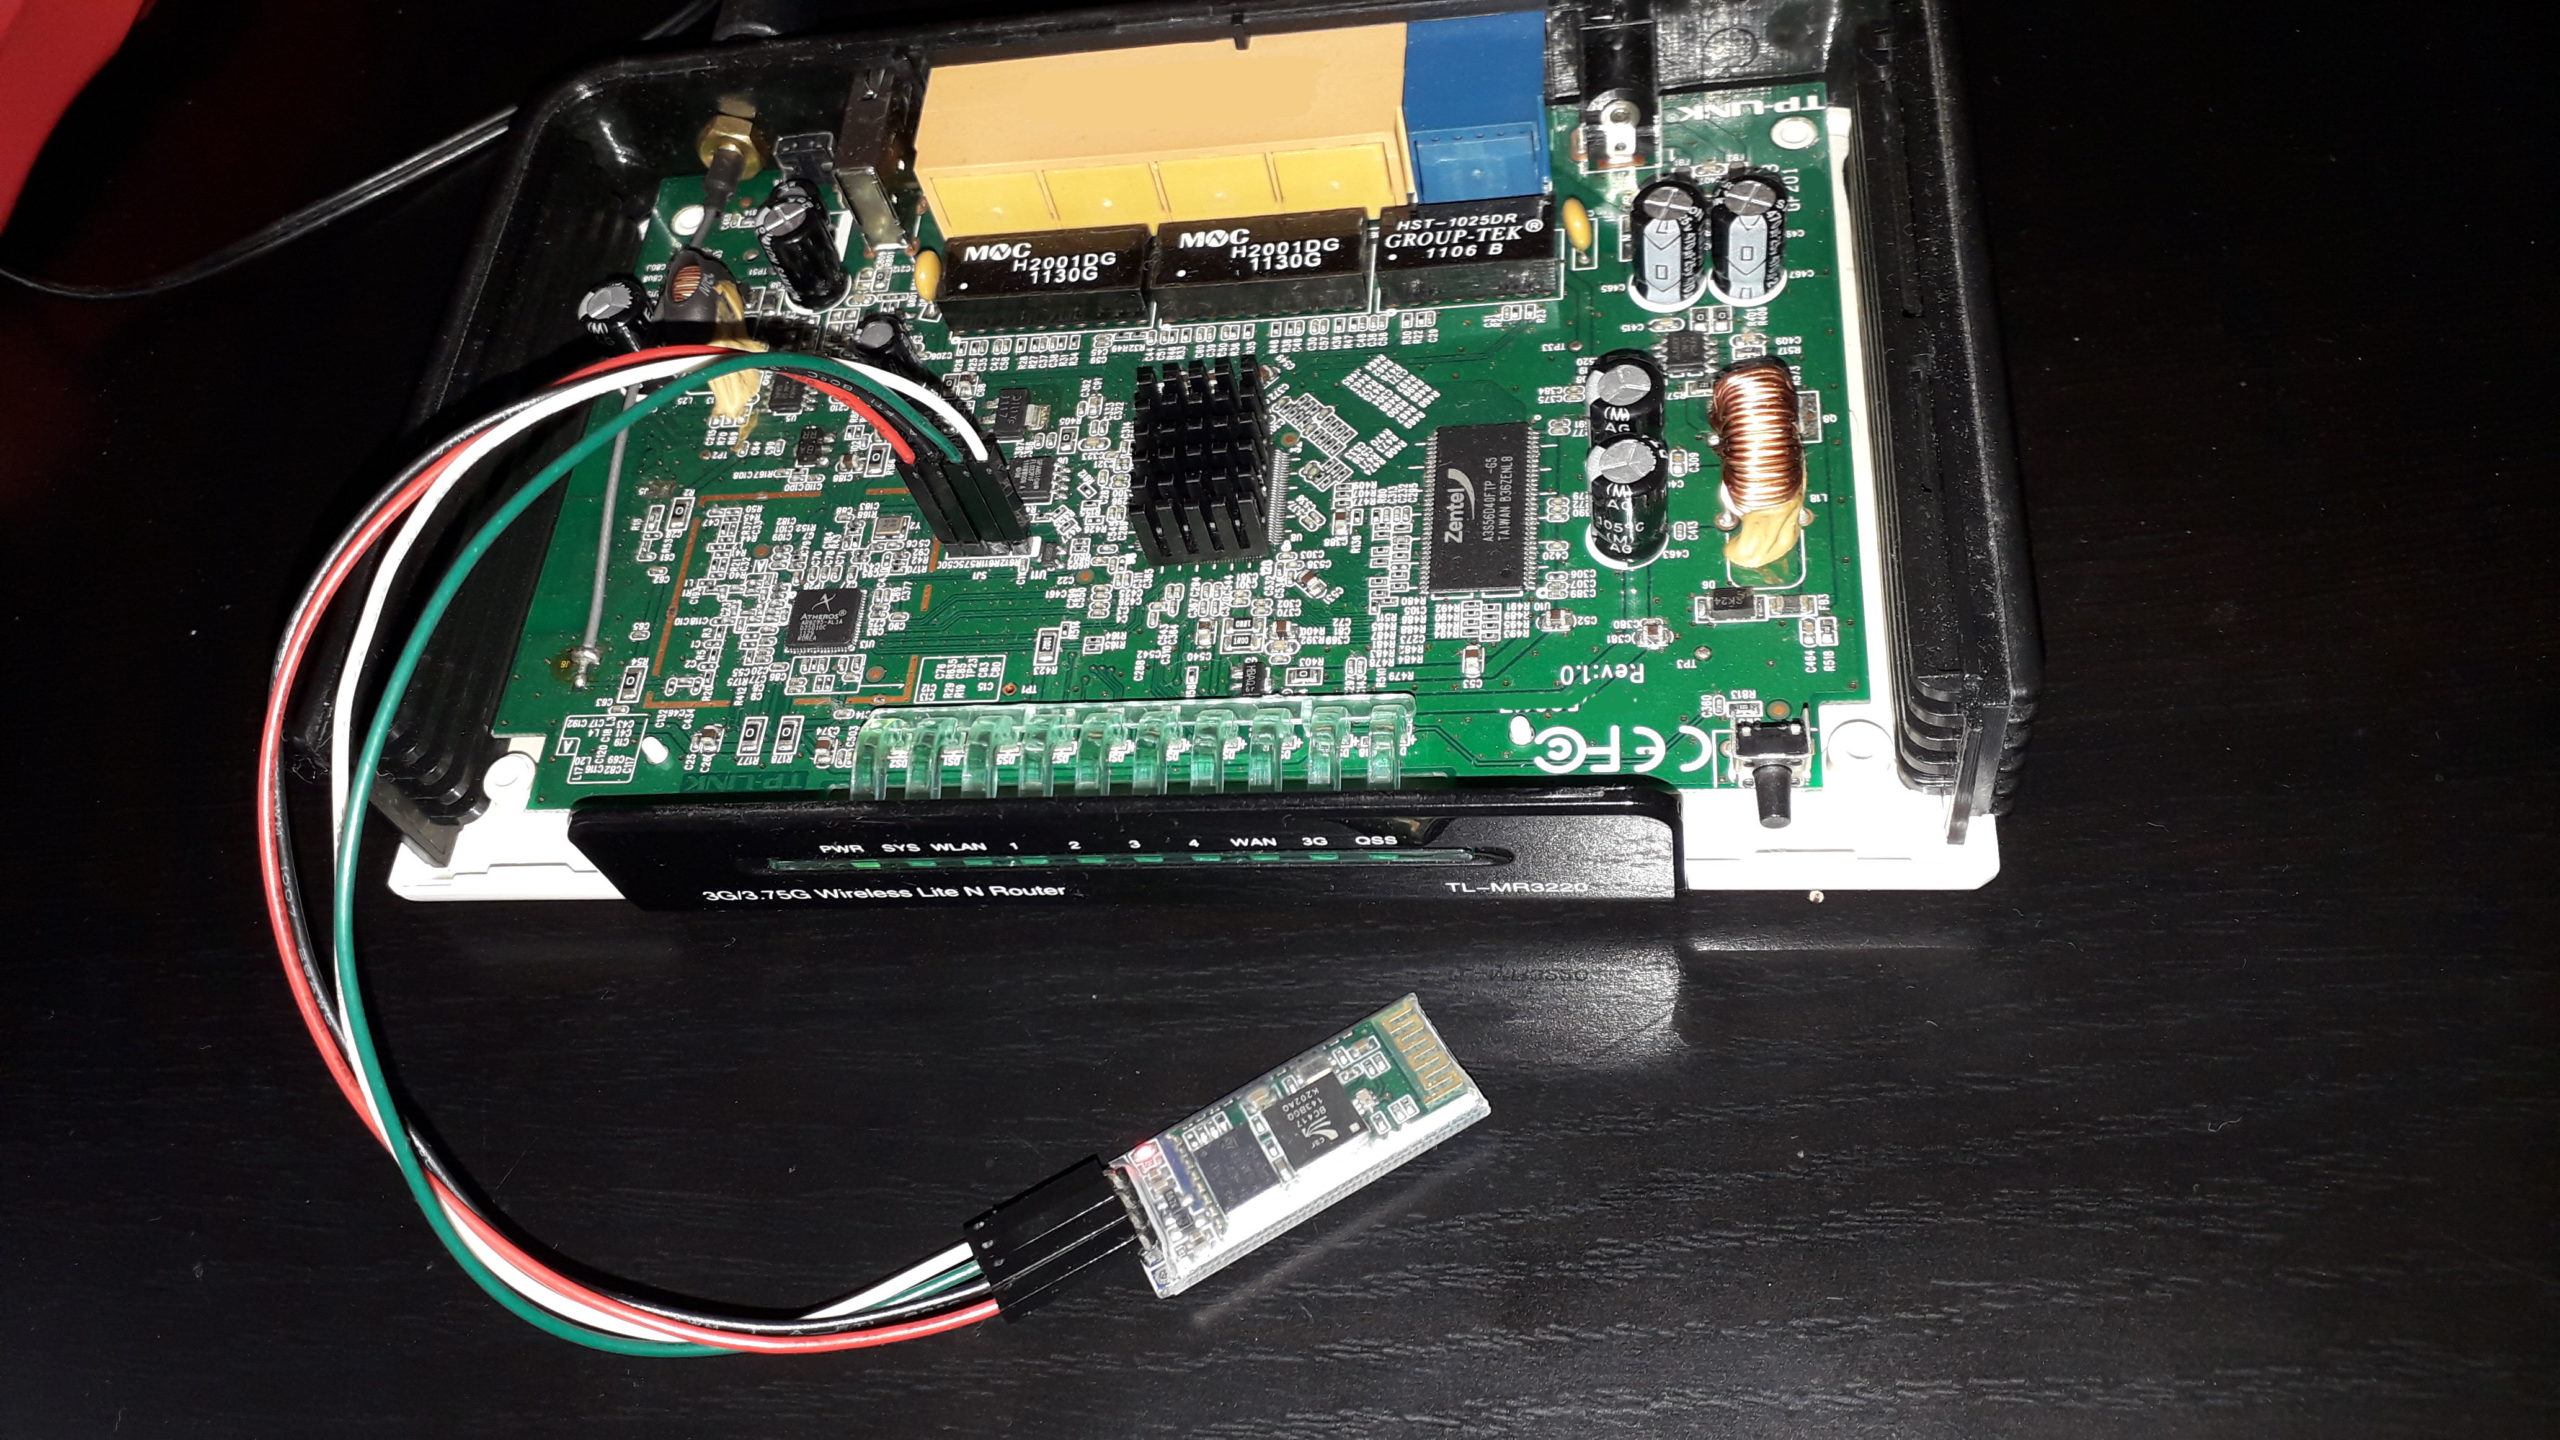
TL-MR3220 serial port connected to bluetooth HC-06 module. Supply of 3.3v is provided by router board red wire. Black is ground, TX and RX (Green and White) for serial I/O.
First, configure HC-06 module for 115200 bps 8 bit data, no parity bit and one stop bit, then connect it to the router. If provided power supply is sufficient to power-up bluetooth module, we will see blinking red led. Module consumption under 3.3v is around 4mA – 8mA for idle state and 20mA – 40mA for normal operation.
Python setup script for HC-06 serial bluetooth module: https://github.com/netquote/hc_utils
$ python3 hc_setup.py /dev/ttyUSB0 -p N --set-pin 1234 --set-name BTS00 --set-rate 115200 --set-parity N

 Guessing bit-rate and parity on /dev/ttyUSB0 …
   Rate: 1200, parity: N
   Rate: 2400, parity: N
   Rate: 4800, parity: N
   Rate: 9600, parity: N
   Rate: 19200, parity: N
   Rate: 38400, parity: N
   Rate: 57600, parity: N
   Rate: 115200, parity: N
 AT device detected.
 Open serial port: /dev/ttyUSB0, bit-rate: 115200, parity: N
 Device version: linvorV1.8
 Set name OK
 Set pin OK
 Set baud 115200
 Set parity  None
Deal with serial ports from source code is pretty straightforward, like write and read any simple file except seek function which is not applicable. Other things, like serial port name and configuration procedures are OS and language specific.
Example Python script for basic serial I/O:
#!/usr/bin/env python

# Import pySerial library
from serial import *

# Open serial port at "115200,8,N,1", timeout 3s
ser = Serial(port='/dev/ttyUSB0',
             baudrate=115200,
             bytesize=EIGHTBITS,
             parity=PARITY_NONE,
             stopbits=STOPBITS_ONE,
             timeout=3)

# Write a string
ser.write(b'Hello!\n')

# Read 30 bytes
print(ser.read(30))

# Close port
ser.close()
This Python demo script should work on both, Linux and Windows platforms, just change device name to “COM1” on Windows.
Another way to deal with serial communication is “kermit” from: http://www.kermitproject.org
Old-school scriptable tool for almost any modem communication related tasks.
; Kermit script for router firmware update via serial line
; Router: TL-MR3220 v1.2 (original bootloader)
; File: "wrt_ser_upload.ksc"
set line /dev/rfcomm3
set speed 115200
set carrier-watch off
set flow-control none
set handshake none
set prefixing all
; Echo serial line to console
SET INPUT ECHO ON
; Clear console input buffer
LINEOUT \21
; Wait for console prompt
INPUT 3 :/#
; System reboot request
LINEOUT reboot
; Wait for U-Boot prompt
INPUT 180 Autobooting in 1 seconds
; Login into u-boot console
OUTPUT tpl
; Wait for u-boot prompt
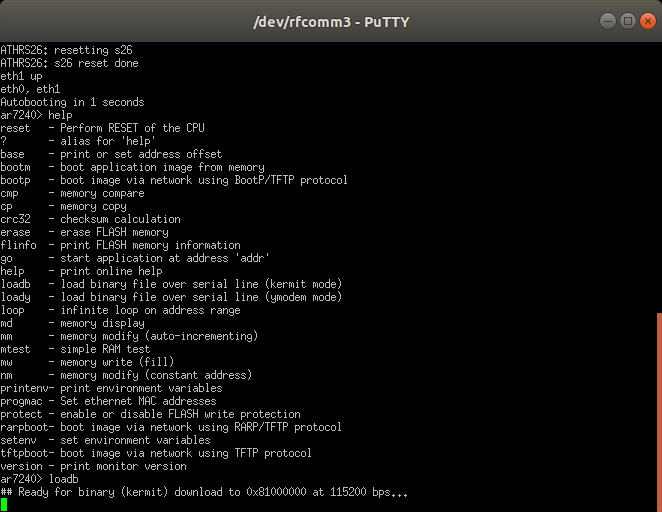
INPUT 3 ar7240>
; Prepare U-Boot for incomming file
LINEOUT loadb 0x81000000
; Wait for u-boot ACK
INPUT 3 Ready for binary (kermit) download
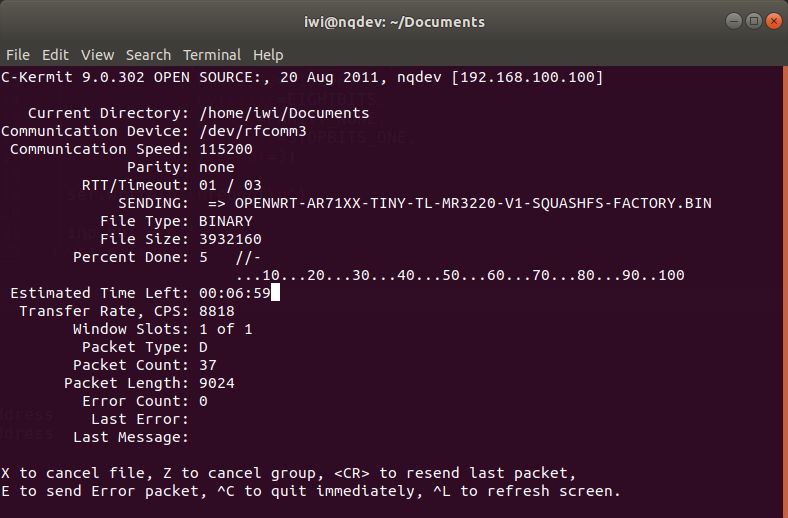
; Send new firmware file
SEND ~/openwrt-18.06/bin/targets/ar71xx/tiny/openwrt-ar71xx-tiny-tl-mr3220-v1-squashfs-factory.bin
; Wait for u-boot prompt
INPUT 3 ar7240>
; Erase target flash memory
LINEOUT erase 0x9f020000 +0x3c0000
; Erase completed
INPUT 60 Erased 60 sectors
; Wait for u-boot prompt
INPUT 3 ar7240>
; Write new firmware to flash
LINEOUT cp.b 0x81000000 0x9f020000 0x3c0000
; Wait for done
INPUT 60 done
; Wait for u-boot prompt
INPUT 3 ar7240>
; Boot into new system
LINEOUT bootm 0x9f020000
; Quit
QUIT 0
This Kermit script updates OpenWRT firmware for TL-MR3220 router v1.2
Router documentation:
https://openwrt.org/toh/tp-link/tl-mr3420
Kermit documentation:
http://www.kermitproject.org
http://www.columbia.edu/kermit/ek.html
https://www.emcraft.com/stm32f429discovery/loading-linux-images-over-uart
HC-06 bluetooth module documentation:
http://www.martyncurrey.com/bluetooth-modules/
http://wiki.pinguino.cc/index.php/SPP_Bluetooth_Modules
https://mcuoneclipse.com/2014/03/30/getting-bluetooth-working-with-jy-mcu-bt_board-v1-06/
HC-06 Firmware reference:
https://www.instructables.com/id/Upgrade-Your-3-Bluetooth-Module-to-Have-HID-Firmwa/
http://dangerousprototypes.com/blog/2012/10/05/open-source-bluetooth-module-firmware/
http://elasticsheep.com/2012/06/bluetooth-module-firmware-dump/
https://github.com/pfalcon/blutunode
http://byron76.blogspot.com/search/label/bluetooth