TP-Link MR3420 setup OpenWRT v18.06
OpenWrt is a powerful Linux distribution for embedded devices. Especially for routers with reduced memory and performance. This objective has contributed to an extreme level of optimization of this distribution, allowing also a high margin of flexibility and really easy setup.
This distribution usually fits on many embedded devices, the complete list can be found at this link: http://wiki.openwrt.org/toh/start
Don’t expect magics from this configuration, you can’t install all the available software, simply because we don’t have enough RAM / ROM memory. Sometimes it is possible to overcome some limitations, for example extending the RAM memory with the ZRAM or SWAP file, extending the root filesystem with a USB flash memory device. However, a stable and robust configuration requires a careful evaluation of the installed services and their impact on system resources. Software as imagemagick or ffmpeg, which tries to allocate a large amount of memory, will likely fail with the segmentation error.
However, everything comes from source and everything is customizable. You can even avoid to install web interface and configure everything by ssh console and UCI command line tool, or build your own web GUI or Service supported by a solid and flexible cross-build system.
Thanks to the excellent work of all OpenWrt team, time to time, we have a new and fresh release to build.
Check your system requirements first: http://wiki.openwrt.org/doc/howto/buildroot.exigence
This new release includes linux kernel updates, different security and bug fixes.
Clone v18.06 branche:
git clone -b openwrt-18.06 git://git.openwrt.org/openwrt/openwrt.git openwrt-18.06
Or master branche:
git clone git://git.openwrt.org/openwrt/openwrt.git openwrt
Next, update feeds:
cd openwrt-18.06/
./scripts/feeds update -a
Configure build system:
make menuconfig
Select router options: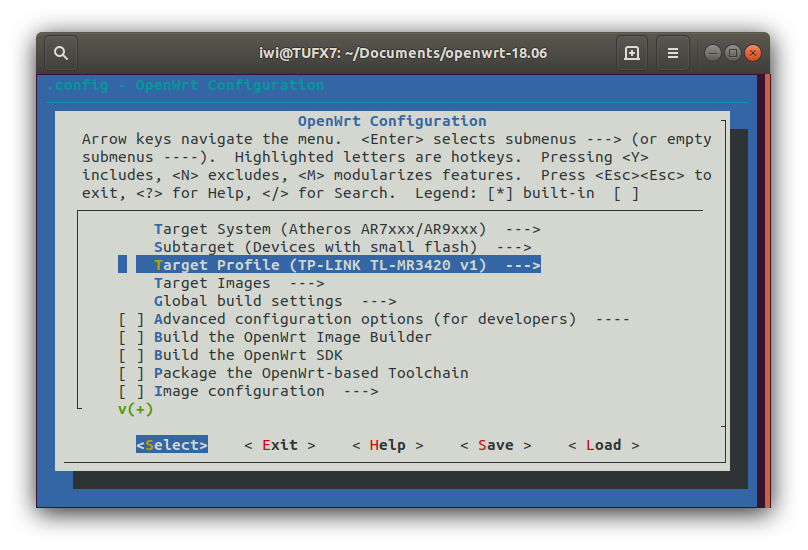 Install LUCI web interface:
./scripts/feeds install luci
Select Luci web interface from menuconfig:
LuCI ---> 1. Collections ---> <*> luci
Choose packages carefully, because we have only 4mb of storage. This amount of memory is enough for many specialized device with a limited set of features like a router or AP. In order to take advantage of many of the packages provided by OpenWrt, it is essential to extend the memory with external USB storage. Blockmount package and root overlay filesystem can do this trick: https://openwrt.org/docs/techref/block_mount
Select block-mount:
Base system --->  <*> block-mount
Kernel modules --->  USB Support --->  <*> kmod-usb-storage
Kernel modules --->  Filesystems --->  <*> kmod-fs-ext4
Another solution is to remove all ip-v6 support. Is configured by default and also supported from kernel side. Hacking on Kernel configuration is especially useful when support for specific hardware is required or simply to enable debugging features or disable something to save space.
Linux kernel configuration:
make kernel_menuconfig
Careful with kernel settings, most of them are unsafe. Don’t touch things, if you are not aware about what are they really doing. At best, you’ll get a slow kernel with a lot of useless code.
Build firmware:
make -j8
Finally, we can find all binary files in “bin/targets/ar71xx/tiny/”
1,2K giu 13 12:04 config.seed
2,8K giu 13 12:07 openwrt-ar71xx-tiny-device-tl-mr3420-v1.manifest
2,7M giu 13 12:07 openwrt-ar71xx-tiny-root.squashfs
3,8M giu 13 12:07 openwrt-ar71xx-tiny-tl-mr3420-v1-squashfs-factory.bin
3,6M giu 13 12:07 openwrt-ar71xx-tiny-tl-mr3420-v1-squashfs-sysupgrade.bin
1,2M giu 13 12:07 openwrt-ar71xx-tiny-uImage-lzma.bin
3,5M giu 13 12:07 openwrt-ar71xx-tiny-vmlinux.bin
3,5M giu 13 12:07 openwrt-ar71xx-tiny-vmlinux.elf
1,2M giu 13 12:07 openwrt-ar71xx-tiny-vmlinux.lzma
1,2M giu 13 12:07 openwrt-ar71xx-tiny-vmlinux-lzma.elf
4,0K giu 13 12:07 packages
1,1K giu 13 12:07 sha256sums
To program the device for the first time is sufficient to upload “factory.bin” to the router, from it’s own classic web interface as usual. For subsequent upgrades from LUCI web interface use “sysupgrade.bin”.
Next topics:
1) Serial debug console
2) Customize your build
3) Remote development
Reference:
All documentation and howto: http://wiki.openwrt.org/doc/start
Multiple builds in one single checkout: http://wiki.openwrt.org/doc/devel/env
Detailed build instructions: http://wiki.openwrt.org/doc/howto/build
Easy patch management: http://wiki.openwrt.org/doc/devel/patches
Creating packages: http://wiki.openwrt.org/doc/devel/packages