Month: January 2011

Fonera 2.0n USB boot script

Some time ago I wrote script for Hacking Fonera Access Point. This script move root file system to USB device and permit any kind of installation and easily revert any changes to original state without stress for internal flash drive. In fact it’s stress USB device but it’s better than damage the internal flash!

How it works:
First time the script copy entire Fonera root file system to USB device, next time everything except kernel is loaded from external USB. If no valid USB drive/partition is detected it’s automatically load internal root file system after about 20s.

Preparing USB drive:
Create on USB device one or more partition with ext2 or ext3 file system. Finally add an empty file named “usbrootfsready” on the root of partition.

Preparing Fonera:
We need to gain access to Fonera shell and create file named “/sbin/usbrootfs” with this contents.

#!/bin/sh
# Fonera2.0n usbrootfs
# Copyright (C) 2009 iwi \at\ hotmail \it\
# exec > /home/usbroot.log 2>&1

USBROOT="/dev/sda1"
USBMNTP="/mnt"
USBFLAG="/usbrootfsready"

/sbin/insmod ext2
/sbin/insmod jbd
/sbin/insmod ext3
/sbin/insmod dwc_otg

for CNTR in $(seq 1 1 10)
do
    sleep 2s
    if [ -b "$USBROOT" ]; then 
        mount -o rw "$USBROOT" "$USBMNTP" && {
            if [ -f "$USBMNTP$USBFLAG" ]; then
                # Copy to new root
                rm "$USBMNTP$USBFLAG"
                cd /rom
                tar -c * | tar -x -C $USBMNTP
                cd /jffs
                tar -c * | tar -x -C $USBMNTP
                cd $USBMNTP
                rm `find | grep META_`
                rmdir jffs
                #rm var
                #mkdir var
                mkdir /usr/lib/opkg
                cd /
            fi
            if [ -f "$USBMNTP/sbin/init" ]; then
                # remount usb as rootfs
                mount -o move /proc $USBMNTP/proc && {
                    pivot_root $USBMNTP $USBMNTP/rom && {
                        mount -o move /rom/dev /dev
                        mount -o move /rom/sys /sys
                        mount -o move /rom/tmp /tmp
                        break
                    }
                    mount -o move $USBMNTP/proc /proc
                }
            fi
            umount "$USBROOT"
        }
        break
    fi
done

Now delete or rename “sbin/init” and create new init file.

#!/bin/sh
# Fonera2.0n init override
# Copyright (C) 2009 Toropov Ivan

/sbin/usbrootfs

exec /bin/busybox init

Don’t forget to mark this files as executables.

chmod +x /sbin/init
chmod +x /sbin/usbrootfs

It’s all. Reboot and enjoy hacking!
MaxSonar sensor and pySerial

LV-MaxSonar-EZ0 sensor by MaxBotix.

Interfacing with computer serial port and Python via pySerial module.

Download Python and pySerial.

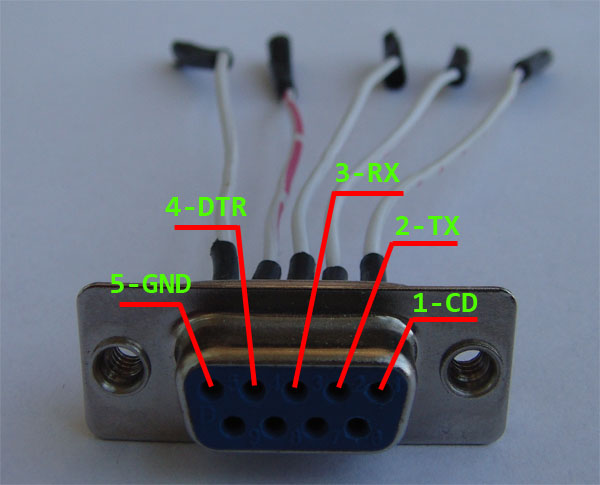
The wiring is so trivial. Start from data sheet we need 4 pins: GND, VCC, TX, RX.
Sensor operating voltage is from 2.5V to 5.5V and the current is about 2mA, then we can get power from serial port DTR or RTS pins. Look at this explanation. ATTENTION! RS-232 specification says that tension can be 25V. You can simply BURN the sonar, computer, house and more… Don’t do anything if you don’t know what are you doing.

In my case I am using USB to RS-232 converter. Output voltage is 5V so I don’t need additional circuitry, just simple pin to pin wiring.

And now little coding…


# Import pySerial module
from serial import *

# Open serial port and setup
ser = Serial("COM10", baudrate=9600, bytesize=8, parity='N', stopbits=1, timeout=1)

# Power up MaxSonar via DTR pin
ser.setDTR(True)

# Infinite loop
while (True):

    # Read serial data
    data = ser.read(5)

    # Check data length 
    if len(data) == 5:

        # Check data packet
        if data[0] == "R" and data[1:4].isdigit():

            # Convert to cm and print 
            print int(data[1:4]) * 2.54, "cm"

    # Request next measurement        
    ser.write(0)

# Close 
ser.close()

Many thanks to Antonio Bugnone for soldering.

Curve fitting with Python

First we need a NumPy and MatPlotLib modules.

Look at curve fitting explanation from wiki.

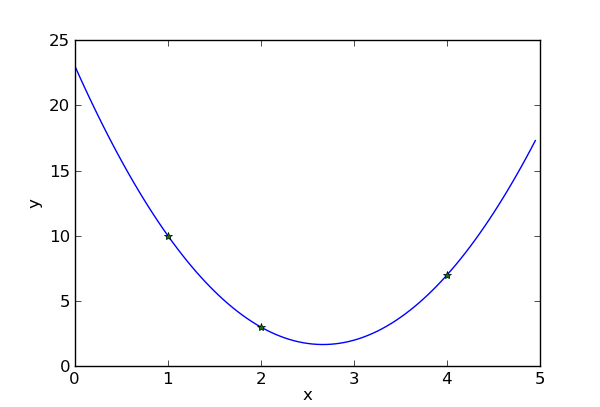
Second degree polynomial equation would help us: y=ax^2 + bx + c
This will exactly fit a simple curve to three points.
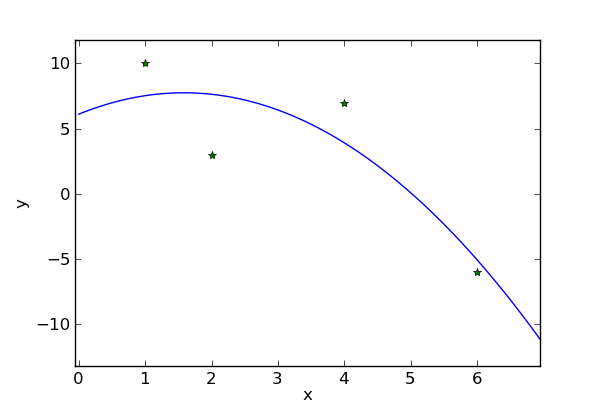
Using more points we get a nearest possible curve.


# Import modules
from numpy import *
from matplotlib.pyplot import *

# Input data (change it)
# X and Y points must have same length
x = [1,  2,  4,   6]
y = [10, 3,  7,  -6]

# (a, b, c) coefficients computation
coefficients = polyfit(x, y, 2)

# With coefficients we make a polynomial object
poly = poly1d(coefficients)

# Create point series
xs = arange(min(x)-1, max(x)+1, 0.05)

# Calculate resultant series
ys = poly(xs)

# Finally draw everything
plot(xs, ys)
plot(x, y, 'o')

# X and Y axis label
ylabel('y')
xlabel('x')

# And show
show()

Using 3 points:
x = [1, 2, 4]
y = [10, 3, 7]

Using 4 points:
x = [1, 2, 4, 6]
y = [10, 3, 7, -6]