Debugging ESP32 with JTAG Adapter on Linux
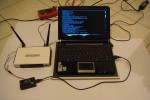
Although Espressif’s website provides detailed instructions, this post offers a quick overview on steps required to setup a JTAG debugger adapter for ESP32 NodeMCU development board on Linux platform.
Why JTAG
JTAG (Joint Test Action Group) is a useful interface for debugging and programming electronic devices such as microcontrollers and digital signal processors for several reasons:
- Non-Intrusive: JTAG is a non-intrusive interface, meaning it can be used to test and debug a device without affecting its normal operation. It provides a way to access the internal circuitry of a device, which is typically not accessible through other interfaces.
- Boundary Scan: JTAG includes a feature called boundary scan that allows designers to test and debug connections on printed circuit boards (PCBs). The boundary scan feature allows to test and diagnose problems with individual components or connection.
- In-System Programming: JTAG can be used to program a device while it is still mounted on a PCB or other system, which is known as in-system programming. This can be useful for updating firmware or debug device without needing to remove it from the system.
- Standardized Protocol: JTAG uses a standardized protocol defined by the IEEE 1149.1 standard, which ensures compatibility between devices and tools from different manufacturers.
- Semi-hosting: Provides a access to Host Resources, redirect “printf” or access to files on the host system as if they were on the local device, making it easier to test and debug software that relies on file input/output.
- Low-Cost: JTAG is a low-cost interface that is widely available on many microcontrollers and other electronic devices. This makes it a popular choice for developers and engineers who need to test and debug electronic systems.
Prerequisites
- Linux host machine, in my case Linux Mint 21.1 distribution is adopted, but any modern Linux distribution should work.
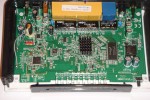
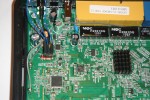
- OpenOCD compatible JTAG debugger hadware, in my case FT2232D that was left over from a previous plug computer project. https://globalscaletechnologies.com/product/gti-jtag-probe/
Reference design for this JTAG interface and connection schematics: https://www.netquote.it/nqmain/wp-content/uploads/SheevaPlug.pdf - Esp32 NodeMCU development board: https://wiki.geekworm.com/NodeMCU-32S
https://www.espressif.com/sites/default/files/documentation/esp32-wroom-32_datasheet_en.pdf
Setup OpenOCD
Because the version of OpenOCD available in this Linux release is outdated and lacks Xtensa support, install the latest release from the official repository: https://openocd.org/pages/getting-openocd.html
For detailed instruction on howto build and install OpenOCD: https://openocd.org/doc-release/README
~/esp32$ git clone https://git.code.sf.net/p/openocd/code openocd-code
Cloning into 'openocd-code'...
remote: Enumerating objects: 77625, done.
...
Resolving deltas: 100% (64682/64682), done.
Run “./bootstrap” when building from the git repository
~/esp32$ cd openocd-code/
~/esp32/openocd-code$ ./bootstrap
+ aclocal --warnings=all
+ libtoolize --automake --copy
+ autoconf --warnings=all
...
libjaylink/Makefile.am: installing 'build-aux/depcomp'
Bootstrap complete. Quick build instructions:
./configure ....
Now we can set some build options like hardware interface support, verbosity, installation directories and disable/enable other features.
~/esp32/openocd-code$ ./configure --enable-ftdi
checking for makeinfo... no
configure: WARNING: Info documentation will not be built.
checking for a BSD-compatible install... /usr/bin/install -c
checking whether build environment is sane... yes
...
OpenOCD configuration summary
--------------------------------------------------
MPSSE mode of FTDI based devices        yes
ST-Link Programmer                      yes (auto)
TI ICDI JTAG Programmer                 yes (auto)
Keil ULINK JTAG Programmer              yes (auto)
Altera USB-Blaster II Compatible        yes (auto)
Bitbang mode of FT232R based devices    yes (auto)
Versaloon-Link JTAG Programmer          yes (auto)
TI XDS110 Debug Probe                   yes (auto)
CMSIS-DAP v2 Compliant Debugger         yes (auto)
OSBDM (JTAG only) Programmer            yes (auto)
eStick/opendous JTAG Programmer         yes (auto)
Olimex ARM-JTAG-EW Programmer           yes (auto)
Raisonance RLink JTAG Programmer        yes (auto)
USBProg JTAG Programmer                 yes (auto)
Espressif JTAG Programmer               yes (auto)
CMSIS-DAP Compliant Debugger            no
Nu-Link Programmer                      no
Cypress KitProg Programmer              no
Altera USB-Blaster Compatible           yes (auto)
ASIX Presto Adapter                     yes (auto)
OpenJTAG Adapter                        yes (auto)
Linux GPIO bitbang through libgpiod     no
SEGGER J-Link Programmer                no
Bus Pirate                              yes (auto)
Use Capstone disassembly framework      yes (auto)
Then make and install as usual, be careful about conflicts with existing OpenOCD installation, remove or add prefix/suffix to the new OpenOCD executable.
~/esp32/openocd-code$ make -j16
...
~/esp32/openocd-code$ sudo make install
...
Add udev rules:
~/esp32/openocd-code$ nano /etc/udev/rules.d/10-ft2322D_jtag.rules
UBSYSTEMS=="usb", ATTRS{idVendor}=="9e88", ATTRS{idProduct}=="9e8f", MODE="0666"
Add user to dialout group:
~/esp32/openocd-code$ sudo usermod -aG dialout $USERJTAG connections:
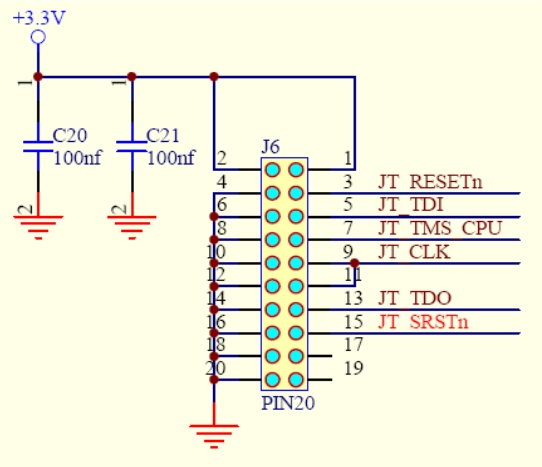
| ESP32 pin | JTAG pin | #J6 |
|---|---|---|
| 3V3 | VTRef (3.3V) | 1 |
| EN | JT_SRSTn | 3 |
| GPIO12 | JT_TDI | 5 |
| GPIO14 | JT_TMS_CPU | 7 |
| GPIO13 | JT_CLK | 9 |
| GPIO15 | JT_TDO | 13 |
| GND | GND | 20 |
Detailed description for JTAG configuration can be found on this page: https://docs.espressif.com/projects/esp-idf/en/latest/esp32/api-guides/jtag-debugging/configure-other-jtag.html
For ESP32 pinout refer to this page: https://www.studiopieters.nl/esp32-pinout/
OpenOCD Configuration and Testing
Now if we run openocd binary we will se somethink like this:
~/esp32/bare_v1$ openocd
Open On-Chip Debugger v0.11.0-esp32-20221026 (2022-10-26-14:47)
Licensed under GNU GPL v2
For bug reports, read
        http://openocd.org/doc/doxygen/bugs.html
embedded:startup.tcl:28: Error: Can't find openocd.cfg
in procedure 'script'
at file "embedded:startup.tcl", line 28
Info : Listening on port 6666 for tcl connections
Info : Listening on port 4444 for telnet connections
Error: Debug Adapter has to be specified, see "adapter driver" command
embedded:startup.tcl:28: Error:
in procedure 'script'
at file "embedded:startup.tcl", line 28
This error, because of unknown adapter. We need to instruct OpenOCD about our hardware interface and target. This can be done by creating a configuration file named ‘esp32_jtag.cfg’ with next settings:
# FT2232D JTAG Adapter Configuration
adapter driver ftdi
ftdi device_desc "SheevaPlug JTAGKey FT2232D B"
ftdi vid_pid 0x9e88 0x9e8f
ftdi channel 0
ftdi layout_init 0x0608 0x0f1b
ftdi layout_signal nTRST -data 0x0200 -noe 0x0100
ftdi layout_signal nSRST -data 0x0800 -noe 0x0400

# The speed of the JTAG interface, in kHz. If you get DSR/DIR errors (and they
# do not relate to OpenOCD trying to read from a memory range without physical
# memory being present there), you can try lowering this.
#
# On DevKit-J, this can go as high as 20MHz if CPU frequency is 80MHz, or 26MHz
# if CPU frequency is 160MHz or 240MHz.
adapter speed 1000

# flash 3.3 V for ESP32-WROOM-32
set ESP32_FLASH_VOLTAGE 3.3

# Load esp32 target configuration
source [find target/esp32.cfg]
You can find a list of available interfaces and targets in the ‘openocd-code/tcl’ folder.
Running JTAG debugger
After launching the debugger, we should see something like this:
~/esp32$ openocd -f esp32_jtag.cfg
Open On-Chip Debugger 0.12.0+dev-00078-gfc30feb51 (2023-03-11-15:26)
Licensed under GNU GPL v2
For bug reports, read
	http://openocd.org/doc/doxygen/bugs.html
force hard breakpoints
Info : Listening on port 6666 for tcl connections
Info : Listening on port 4444 for telnet connections
Info : clock speed 1000 kHz
Info : JTAG tap: esp32.cpu0 tap/device found: 0x120034e5 (mfg: 0x272 (Tensilica), part: 0x2003, ver: 0x1)
Info : JTAG tap: esp32.cpu1 tap/device found: 0x120034e5 (mfg: 0x272 (Tensilica), part: 0x2003, ver: 0x1)
Info : starting gdb server for esp32.cpu0 on 3333
Info : Listening on port 3333 for gdb connections
Info : Set GDB target to 'esp32.cpu0'
Open your favorite telnet console on localhost at port 4444
~$ telnet localhost 4444
Trying 127.0.0.1...
Connected to localhost.
Escape character is '^]'.
Open On-Chip Debugger
> help
...
Brief command list:
| Command | Description |
| help [command_name] | Show full command help; command can be multiple tokens. (command valid any time) |
| version | show program version (command valid any time) |
| reset [run|halt|init] | Reset all targets into the specified mode. Default reset mode is run, if not given. |
| halt [milliseconds] | request target to halt, then wait up to the specified number of milliseconds (default 5000) for it to complete |
| targets [target] | change current default target (one parameter) or prints table of all targets (no parameters) (command valid any time) |
| flash banks | Display table with information about flash banks. (command valid any time) |
| reg [(number|name)] reg [(value|’force’)] | display (reread from target with “force”) or set a register; with no arguments, displays all registers and their values |
| resume [address] | resume target execution from current PC or address |
| scan_chain | print current scan chain configuration (command valid any time) script |
| shutdown | Close the OpenOCD server, disconnecting all clients (GDB, telnet, other). If option error is used, OpenOCD will return a non-zero exit code to the parent process. If user types CTRL-C or kills OpenOCD, the command shutdown will be automati- cally executed to cause OpenOCD to exit. |
| arm semihosting [‘enable’|’disable’] | Set the base directory for semihosting I/O.DEPRECATED! use arm activate support for semihosting operations |
| arm semihosting_basedir [dir] | set the base directory for semihosting I/O operations |
| arm semihosting_fileio [‘enable’|’disable’] | activate support for semihosting fileio operations |
| arm semihosting_redirect (disable | tcp [‘debug’|’stdio’|’all’]) | redirect semihosting IO |
| init | Initializes configured targets and servers. Changes command mode from CONFIG to EXEC. Unless ‘noinit’ is called, this command is called automatically at the end of startup. (command valid any time) |