Category: Python

Gentoo default Python interpreter

Gentoo default Python interpreter is set to version 3.1:
~ # eselect python list
Available Python interpreters:
[1] python2.6
[2] python3.1 *

Command to change default interpreter:
~ # eselect python set 1
And now interpreter version is 2.6:
~ # eselect python list
Available Python interpreters:
[1] python2.6 *
[2] python3.1

Installing version 2.7:
~ # nano /etc/portage/package.accept_keywords
=dev-lang/python-2.7*
^X (Ctrl+X) --> exit & save
~ # emerge --ask =dev-lang/python-2.7*

Rebuild Python modules:
~ # python-updater
* Starting Python Updater...
* Main active version of Python: 2.7
* Active version of Python 2: 2.7
* Active version of Python 3: 3.1

Happy python coding!
Gentoo web2py daemon

Gentoo RC init script for web2py framework

Save as “/etc/init.d/web2py”

#!/sbin/runscript
# Gentoo web2py init script

WORK_PATH="/home/web2py"
WORK_FILE="web2py.py"

PYTHON="/usr/bin/python2.6"
PIDFILE="/var/run/web2py.pid"

PASSWORD="<recycle>"
SRV_ADDR="0.0.0.0"
SRV_PORT="8000"
SRV_CRT=""
SRV_KEY=""

depend(){
  need net
}

start() {
  ebegin "Starting web2py"
  start-stop-daemon --start --quiet --background --chdir "$WORK_PATH" \
                    --pidfile $PIDFILE --exec "$PYTHON" \
                    -- "$WORK_PATH/$WORK_FILE" \
                    --nogui --password="$PASSWORD" \
                    --pid_filename="$PIDFILE" \
                    --ip=$SRV_ADDR --port=$SRV_PORT \
                    --ssl_certificate="$SRV_CRT" --ssl_private_key="$SRV_KEY"
  eend $?
}

stop() {
  ebegin "Stopping web2py"
  start-stop-daemon --stop --pidfile $PIDFILE
  eend $?
}

To make a file executable:
chmode +x /etc/init.d/web2py
Add to default runlevel:
rc-update add web2py default
Start daemon:
rc-config start web2py

Python GUI calc

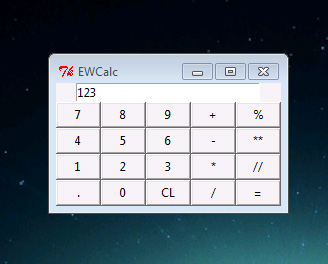
Python GUI experiment. Simple calculator application made with Tk.
It’s a first choice because it’s integrated into Python, simple to use and powerful enough for most cases. It’s also cross platform like an interpreter.
However, there are many other libraries for GUI:
http://wiki.python.org/moin/GuiProgramming

#!/usr/bin/python

# Python GUI calculator 
# (C) 2011 - netquote.it
# Original code by Emanuele Chiabrera
# Enhanced by Toropov Ivan 

from Tkinter import *

# button text list
cmdlst = ['7', '8', '9', '+', '%',
          '4', '5', '6', '-', '**',
          '1', '2', '3', '*', '//',
          '.', '0', 'CL', '/', '=']

class MyButton(Button):
    
    backref = None
    
    def Click(self):
        # back reference
        self.backref.BtnCmd(self["text"])


class CalcApp:

    def __init__(self, master):
        frame = Frame(master)
        
        self.textbox = Entry(width=30, takefocus=1)
        self.textbox.pack(side=TOP)
        self.textbox.focus_force()

        self.buttons = []
        for n, c in enumerate(cmdlst):
            self.buttons.append(MyButton(frame, text=c, width=5))
            self.buttons[n]["command"] = self.buttons[n].Click
            self.buttons[n].backref = self
            self.buttons[n].grid(row=n/5, column=n%5)

        frame.pack()

    def BtnCmd(self, cmd):
        if cmd == '=':
            try:
                res = eval(self.textbox.get())
            except:
                res = "Error!"
            self.textbox.delete(0, END)
            self.textbox.insert(0, str(res))
        elif cmd == 'CL':
            self.textbox.delete(0, END)
        else:
            self.textbox.insert(END, cmd)

root = Tk()
root.title("EWCalc")

calcapp = CalcApp(root)
root.mainloop()

What comes out:

MaxSonar sensor and pySerial

LV-MaxSonar-EZ0 sensor by MaxBotix.

Interfacing with computer serial port and Python via pySerial module.

Download Python and pySerial.

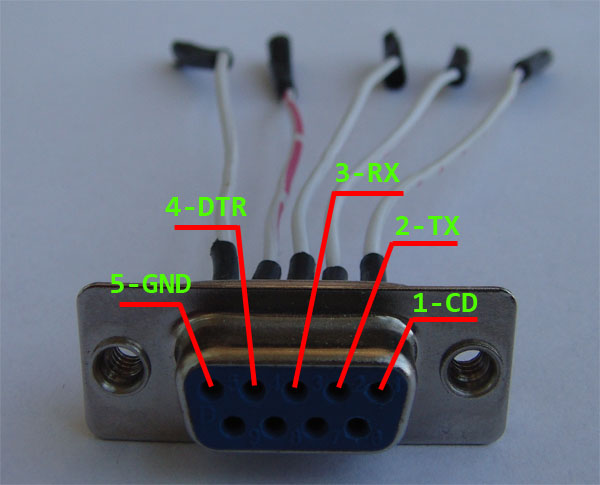
The wiring is so trivial. Start from data sheet we need 4 pins: GND, VCC, TX, RX.
Sensor operating voltage is from 2.5V to 5.5V and the current is about 2mA, then we can get power from serial port DTR or RTS pins. Look at this explanation. ATTENTION! RS-232 specification says that tension can be 25V. You can simply BURN the sonar, computer, house and more… Don’t do anything if you don’t know what are you doing.

In my case I am using USB to RS-232 converter. Output voltage is 5V so I don’t need additional circuitry, just simple pin to pin wiring.

And now little coding…


# Import pySerial module
from serial import *

# Open serial port and setup
ser = Serial("COM10", baudrate=9600, bytesize=8, parity='N', stopbits=1, timeout=1)

# Power up MaxSonar via DTR pin
ser.setDTR(True)

# Infinite loop
while (True):

    # Read serial data
    data = ser.read(5)

    # Check data length 
    if len(data) == 5:

        # Check data packet
        if data[0] == "R" and data[1:4].isdigit():

            # Convert to cm and print 
            print int(data[1:4]) * 2.54, "cm"

    # Request next measurement        
    ser.write(0)

# Close 
ser.close()

Many thanks to Antonio Bugnone for soldering.

Curve fitting with Python

First we need a NumPy and MatPlotLib modules.

Look at curve fitting explanation from wiki.

Second degree polynomial equation would help us: y=ax^2 + bx + c
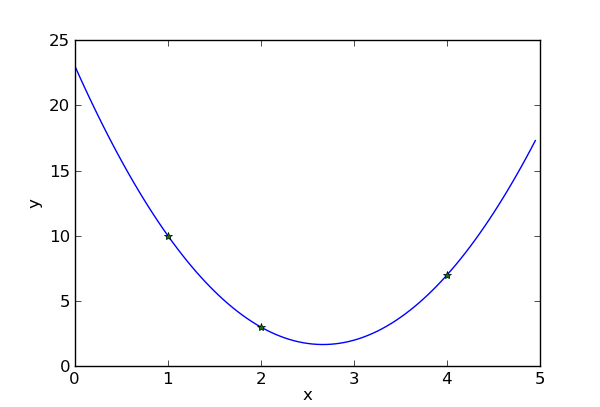
This will exactly fit a simple curve to three points.
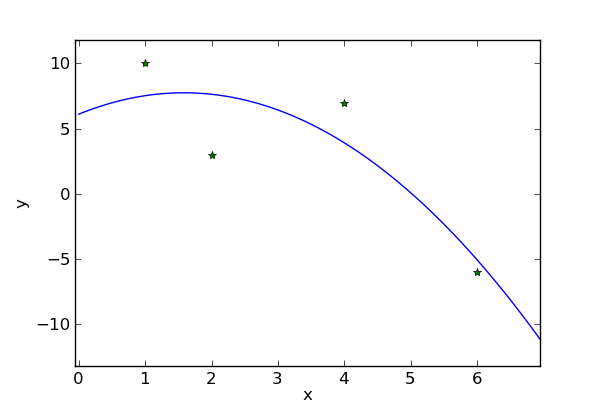
Using more points we get a nearest possible curve.


# Import modules
from numpy import *
from matplotlib.pyplot import *

# Input data (change it)
# X and Y points must have same length
x = [1,  2,  4,   6]
y = [10, 3,  7,  -6]

# (a, b, c) coefficients computation
coefficients = polyfit(x, y, 2)

# With coefficients we make a polynomial object
poly = poly1d(coefficients)

# Create point series
xs = arange(min(x)-1, max(x)+1, 0.05)

# Calculate resultant series
ys = poly(xs)

# Finally draw everything
plot(xs, ys)
plot(x, y, 'o')

# X and Y axis label
ylabel('y')
xlabel('x')

# And show
show()

Using 3 points:
x = [1, 2, 4]
y = [10, 3, 7]

Using 4 points:
x = [1, 2, 4, 6]
y = [10, 3, 7, -6]